You want sharper planetary shots without blowing the budget. Choose a few targeted filters—a UV/IR cut for cleaner color and one or two color or methane/IR filters for contrast—and you can pull meaningful detail from Jupiter, Saturn, and Mars with a budget-friendly setup.

This post shows which filter types matter for planetary imaging, how they change contrast and color, and which affordable options give the best return for your money. You’ll also get practical tips on matching filters to your camera or eyepiece, stacking limitations, and simple maintenance that keeps cheap glass performing well.
Stick around to see compact, budget-first recommendations and hands-on techniques that make the most of tight gear budgets while improving planetary detail and contrast.
Why Use Filters for Planetary Photography?

Filters give you practical control over contrast, color, and unwanted light so you can extract real surface details and atmospheric structure. They help you pull out features that seeing conditions and your optics alone often hide.
Boosting Contrast and Image Clarity
You’ll gain sharper, clearer frames by using filters that raise contrast between adjacent tones. Color and narrowband filters selectively transmit wavelengths where planetary features show strongest contrast. For example, a red or orange filter increases contrast on Mars’ dark markings and dust lanes, while blue filters can sharpen Jovian cloud band edges when seeing is good.
Use filters to reduce broadband glare from bright targets. A moon filter or neutral density element cuts overall brightness so you can expose longer without saturating highlights. That improves signal in subtle midtones like crater rims or storm boundaries. For stacking, cleaner individual frames means less noise and better detail when you process.
Practical tips:
- Start with a moon or neutral filter on bright targets to avoid blown highlights.
- Switch color filters to emphasize a specific feature, then capture sequences for later channel blending.
- Combine filtering with high-frame-rate capture for best results under variable seeing.
Revealing Surface Features and Atmospheric Details
Filters help you isolate wavelengths where surface minerals or atmospheric gases contrast most with surrounding areas. On Mars, a red filter boosts albedo contrast between volcanic plains and dust-covered regions, making Syrtis Major and other features easier to map. For Jupiter and Saturn, short-wavelength filters (blue/violet) can emphasize high-altitude hazes and small-scale turbulence, while methane or IR-pass filters reveal deeper cloud structures and banding.
You’ll often use different filters in sequence to build a multispectral dataset. Capture narrowband or IR frames to see structure obscured in visible light, then merge channels to produce a more informative final image. Astrophotographers use this approach to separate true surface detail from scattering or limb glow.
Quick workflow:
- Pick one filter per target feature (color for albedo, IR for deeper structure).
- Record equal-length capture runs for later alignment and stacking.
- Label captures clearly so you can combine complementary wavelengths in post.
Reducing Light Pollution for Urban Astrophotography
When you shoot from a city, light pollution raises sky background and washes out faint contrast. Broadband light-pollution filters (like skyglow or UHC types for planetary work in bright skies) selectively reject common streetlamp emission lines and lower background without severely dimming the planet itself. That yields higher contrast between the planet’s disk and the sky, making it easier to resolve subtle surface markings.
Variable polarizers and narrowband options also help reduce scattered light and improve perceived sharpness. For planetary targets, darkening the sky a little lets you use longer exposures or lower gain, producing cleaner frames for stacking. If you regularly image from suburban or urban sites, including a CPL or light-pollution filter in your kit will measurably improve final detail recovery.
Practical checklist:
- Test filters under your local streetlight spectrum to see which reduces background most.
- Combine pollution filters with short exposures and more frames to maintain sharpness.
- Keep notes on which filter worked best for each target and sky condition for repeatable results.
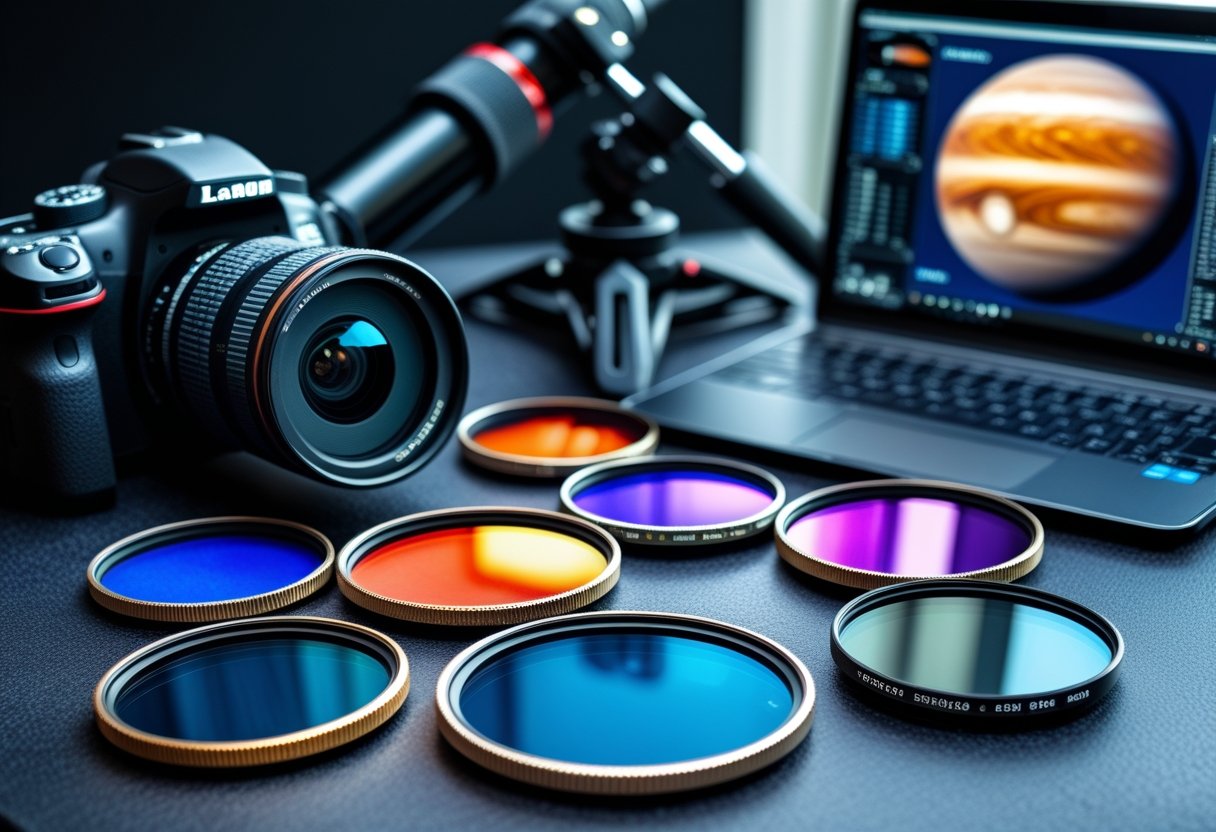
Key Types of Filters for Planetary Imaging

These filters change how your telescope and camera capture planets: some boost contrast for specific features, others cut wavelengths that blur detail, and a few reduce overall brightness or urban sky glow.
Color Filters: Enhancing Planetary Details
Color filters (red, orange, yellow, green, blue, violet) let you isolate wavelengths that emphasize different planetary features. Use a red or orange filter to darken Martian dust and increase contrast on surface markings. A blue or #80A filter enhances high-altitude clouds and subtle banding on Jupiter and Saturn.
For imaging, color filters work well with monochrome cameras: capture separate monochrome frames through each filter, then combine them into a color composite to increase detail and reduce chromatic blur. For visual observing, screw-in 1.25″ filters are the simplest option.
Keep in mind color filters reduce overall light; expect longer exposures or higher gain. Try mid-bandwidth glass for a balance between contrast gain and brightness loss.
UV/IR Cut Filters: Sharper and Clearer Images
A UV/IR cut filter blocks ultraviolet and infrared wavelengths that your optical system and camera still pick up. Those out-of-band rays do not focus the same as visible light and cause soft, washed-out images—so a UV/IR cut filter tightens stellar and planetary detail.
You’ll commonly see these in 1.25″ or 2″ threaded formats and as an inexpensive upgrade that fits directly into the visual or imaging train. Use one when pairing color cameras or when your telescope suffers from significant chromatic focus shift.
Note: a dedicated UV filter or IR filter targets a single band; UV/IR cut filters block both, making them the best general-purpose choice for sharper planetary photos.
Neutral Density and Polarizing Filters
Neutral density (ND) filters reduce the total light entering your camera without changing color balance. Use ND filters to avoid saturation when imaging very bright targets like the Moon or Venus, or to enable longer exposures with larger apertures. They come in fixed stops (ND2, ND4, etc.) and in 1.25″ or 2″ sizes.
Circular polarizing (CPL) filters are less common in planetary work but can help reduce atmospheric glare and scattered light during low-altitude observations. A CPL also offers modest contrast improvements on bright, high-reflectance features.
Both ND and CPL reduce signal; balance exposure time and sensor noise. For imaging planets, prefer the lowest attenuation that achieves correct exposure.
Light Pollution Reduction Filters
Light pollution reduction (LPR) and broadband skyglow filters selectively cut common streetlight and sky emission bands while passing most visible wavelengths. They help more with deep-sky than planetary targets, but in urban settings an LPR can still improve contrast by reducing orange and green sodium/mercury light spill.
Narrowband filters (like dual-band H-alpha/OIII) do not suit broadband planetary reflected-light targets, so avoid them for planets. Instead choose a broadband LPR designed to preserve natural planet colors while trimming sky glow.
Test any LPR on your target: some models shift color balance and require white-balance or calibration frames to maintain accurate planetary hues.
Links to further reading: learn about color filters and planetary uses at SpectraLore (https://spectralore.com/astronomy-stargazing/color-filters-planets) and read basic filter types at Astronomy Magazine (https://www.astronomy.com/observing/astroimaging-filter-basics/).
Budget-Friendly Filter Recommendations
You can improve planetary detail, cut glare, and reduce light pollution without spending much. Pick filters that match your telescope’s 1.25″ or camera adapter thread, and prioritize coated optical glass and clear labeling (e.g., #21, #12, IR/UV cut).
Top Entry-Level Planetary Filters
Start with single-color screw-in filters that fit 1.25″ eyepieces or camera adapters. Common useful choices: a yellow (#12) to sharpen lunar and Mars contrast, an orange (#21) to boost Martian surface detail, and a light blue (#80A) to increase contrast on Jupiter’s cloud bands. Each sells under $30 in many kits.
Look for multi-coated optical glass and aluminum cells for durability. Avoid unmarked plastic filters; they often tint rather than improve contrast. If you only buy one, the yellow (#12) or neutral density polarizer for the Moon gives the largest immediate improvement.
Benefits at a glance:
- Improves local contrast and feature visibility
- Low cost and easy to carry
- Fits most 1.25″ setups
Best Value Filter Sets for Beginners
Value kits bundle 4–7 filters (moon, CPL, and color set) for under $70. These cover common targets: Moon, Mars, Jupiter, and bright planets. A typical kit includes a moon/ND filter to reduce glare, a circular polarizer for adjustable dimming, plus red, yellow, green, and blue color filters for targeted contrast.
Kits save money versus buying individually and let you test combinations. Check that the kit lists transmission data or filter numbers and includes a padded case. Confirm 1.25″ threading or availability of 2″ adapters before buying to avoid compatibility issues.
Typical pros and cons:
- Pro: broad utility for visual and casual imaging
- Con: stacked filters reduce brightness; not all colors work for every target
Affordable Specialized Filters for Unique Needs
If you want a specific improvement, choose budget specialist pieces like a UV/IR cut for DSLR/planetary cameras or a methane band filter for gas-giant imaging. A UV/IR cut (often under $50) tightens star images and reduces color fringing on sensors. Methane filters cost more but reveal cloud features on Jupiter and Saturn in monochrome imaging.
Match specialized filters to your workflow: monochrome cameras pair best with narrowband or methane filters; color sensors benefit from UV/IR cut and color-enhancing glass. Check compatibility with your camera’s sensor size and the telescope’s focal ratio to avoid vignetting or poor throughput.
How to Choose the Right Filter for Your Setup
Picking the right filter comes down to three things: physical compatibility with your optical train, the wavelengths the filter passes or blocks, and whether you can mount and switch it quickly during a session.
Matching Filters to Telescopes and Cameras
You need filters that match both your telescope type and camera sensor. With refractors and reflectors, standard 1.25″ or 2″ threaded filters screw into eyepieces or camera adapters. Catadioptric telescopes (Schmidt–Cassegrain or Maksutov) commonly use 1.25″ threads at the visual back, so verify the thread size before buying.
For imaging, match filters to the camera: color CMOS/DSLR cameras usually use broadband color or UV/IR cut filters, while monochrome cameras get the biggest benefit from narrowband or RGB sets and methane/IR filters. Monochrome cameras also pair well with a filter wheel for fast switching between wavelengths.
Check focal reducer or flattener spacing: filter thickness changes backfocus and can affect focus, especially on fast focal ratios. If you use eyepieces for visual checks, ensure the same threaded size or have 1.25″ to 2″ adapters on hand.
Considerations for Filter Size and Mounting
Measure the physical path where a filter will sit: common sizes are 1.25″ and 2″ for visual eyepieces and camera adapters. For DSLR or dedicated astro cameras, you may need a T‑thread (M42) or custom adapter rather than a standard eyepiece filter.
Decide how you’ll mount and change filters. Hand‑screwed cell filters work well for occasional use. If you plan to capture multiple wavelengths in one night, a motorized or manual filter wheel saves time and avoids repeated re‑focusing. Use low‑profile filters in stacked setups to minimize vignetting on fast systems.
Also confirm clear aperture and cell thickness. Cheap filters may vignette an unvignetted field on fast scopes; higher quality multi‑coated filters preserve transmission and reduce reflections. Keep adapters and extension tubes ready to preserve correct backfocus with flatteners or reducers.
Balancing Performance and Cost
Prioritize optical glass and coatings before brand name. Multi‑coated, multi‑element filters give better transmission and less color cast than single‑coated budget pieces. For planetary work, start with a UV/IR cut and a few color filters (yellow, red, blue) for visual and basic imaging; these address most contrast needs without heavy expense.
If you shoot with a monochrome camera, invest in narrowband or specialized methane/IR filters only if you’ll use them regularly—otherwise they’re a pricey niche. Consider used or entry‑level sets (like economical 1.25″ packs) to test which wavelengths help your seeing conditions most.
Factor in mounting hardware: a cheap high‑quality filter plus a reliable filter wheel or adapter often beats a full premium set that you can barely fit into your train.
Maximizing Performance With Filter Techniques
You’ll learn practical ways to mix filters, reduce color errors, and set exposure so your planetary frames keep fine detail without wasting photons. Focus on which filters to pair, how to prevent chromatic issues, and how exposure choices affect signal-to-noise and vignetting.
Combining Filters for Enhanced Results
Use complementary filter pairs rather than stacking many at once. Combine a UV/IR cut with a narrow color or methane filter to remove out-of-band blur while still isolating useful wavelengths. That pairing preserves transmission efficiency and keeps total light loss low.
When you stack, pay attention to mechanical vignetting—use matching thread sizes or a filter drawer to avoid edge shading. Test combinations on bright planets (Jupiter or Venus) at short exposures to check for color shifts before long runs.
Practical sequence: place the UV/IR cut closest to the camera sensor, then color-specific filters outward. Record a short calibration set (flats and darks) with each combination so you can correct transmission differences during stacking. Keep notes of exposure multipliers and filter order for repeatable results.
Reducing Chromatic Aberration and Artifacts
Chromatic aberration shows as colored fringes on high-contrast planetary features. Combat it by using a high-transmission color-correction filter (OD/AR coatings help) or a dedicated color-correction element that blocks problematic blue/UV spill.
Also manage lens/telescope focus across wavelengths. Focus slightly toward the red for refractors with strong blue focus shift, then refine with live stacking. If you use a monochrome camera, apply narrowband filters to avoid mixed-focus issues entirely.
Watch for internal reflections and ghosting from stacked filters. Use quality multi-coated filters and avoid excessive spacing between elements. Capture calibration frames to remove small optical artifacts during post-processing.
Managing Exposure Time and Signal-to-Noise
Choose exposure time to freeze seeing while maximizing photons per frame. For planetary work, aim for exposures that capture sharp moments—typically 5–30 ms for high frame-rate cameras on good seeing nights, longer for faint methane bands if seeing is stable.
Compensate for transmission loss from filters by increasing total captured frames rather than drastically lengthening single exposures. Stacking thousands of short frames raises effective signal-to-noise without smearing fine detail.
Monitor histogram and keep peaks well above read noise but below saturation. If using multiple filters with different transmission efficiencies, record per-filter gain/exposure settings and balance total integration time so each wavelength contributes similar SNR. Adjust for vignetting with flats taken through the exact filter stack.
Essential Maintenance and Accessories for Budget Filters
Keep your budget filters performing well by cleaning gently, protecting coatings, and adding low-cost accessories that save time and reduce frustration.
Proper Care and Cleaning for Longevity
Treat filter surfaces as delicate optical glass. Use a blower to remove loose dust first, then a microfiber cloth or dedicated optical tissue with a few drops of lens cleaning solution to wipe in a single direction. Avoid household cleaners and paper towels; they can damage anti-reflective and other filter coatings.
Store filters threaded into eyepiece barrels or in padded cases to prevent scratches and pressure on coatings. Handle only the metal rims, not the glass, to reduce fingerprints and oil transfer. If you see stubborn spots, soak the filter in a lens-safe solution for a few minutes before wiping. Inspect coatings under good light after cleaning to catch tiny abrasions early.
Check threaded fittings and mounting flats for nicks that can prevent a tight seal. Replace O-rings or foam pads on adapters; cheap mechanical damage often causes more image issues than optical faults. Label each filter with its color and transmission band to avoid repeated handling.
Popular Accessories: Filter Wheels and Adapters
A simple manual 1.25″ filter wheel saves time and protects coatings by letting you switch filters without removing the eyepiece. Look for aluminum bodies with smooth detents and metal threads to avoid cross-threading. Plastic wheels may be cheaper but often wear fast and let in stray light.
Threaded adapters let you use 2″ filters or stack filters without stressing threads. Choose adapters with knurled rings or thumbscrews so you can change filters in the dark without tools. If you plan imaging, add a T-adapter with a parfocaling spacer to keep focus shifts minimal when swapping filters.
Keep a small toolkit: hex keys, camera / eyepiece spanner, spare thumbscrews, and a pack of replacement O-rings. These low-cost accessories cut downtime and prevent field improvisation that risks scratching optical glass or damaging anti-reflective coatings.
Avoiding Common Issues With Budget Filters
Budget filters more often suffer from poor coatings and fitment issues. Verify that a filter’s anti-reflective coating is even and scratch-free before use. Uneven coatings cause ghosting and reduced contrast; return or replace filters that show streaking under bright light.
Watch for light leaks from loose adapters or cheap filter wheels; even a sliver of stray light reduces planetary contrast. Test your setup during daylight with a bright lamp to locate leaks and tighten or pad connections. Also check thermal equilibrium: plastic mounts and thin metal can create tube currents—give filters time to reach ambient temperature.
Avoid stacking more than two filters unless necessary; each additional optical surface increases reflections and reduces throughput. When possible, choose single, well-matched filters and rely on mechanical accessories to switch them rather than stacking.
Leave a Reply